
The official Christmas countdown isn’t on until I put my Christmas DIY of the year over the blog!
I don’t know how I managed this, but apparently, around Christmas time I get all the energy and inspiration for crafting.
My Mum really loves Christmas tree ornaments (every year she buys another ton claiming “we don’t have enough”) and last year, when I gave her some personalised, handmade Christmas balls she was ecstatic. So, what better way to surprise Mum if not with another round of handmade Christmas tree decorations?!
Luckily, Pinterest is full of inspiration and creativity and my brain couldn’t stop thinking of some gorgeous Christmas trees decorations – they are literally Christmas trees. 🙂
Related: DIY Adorable Reindeer Mason Jars
It was quite a process, the first two ornaments were such a pain – four hands weren’t enough to keep the ribbon and beads together, but luckily I found a better way to do it. Let’s hope I can explain it well enough for you too.
Sparkly Christmas Trees Christmas Tree Decorations
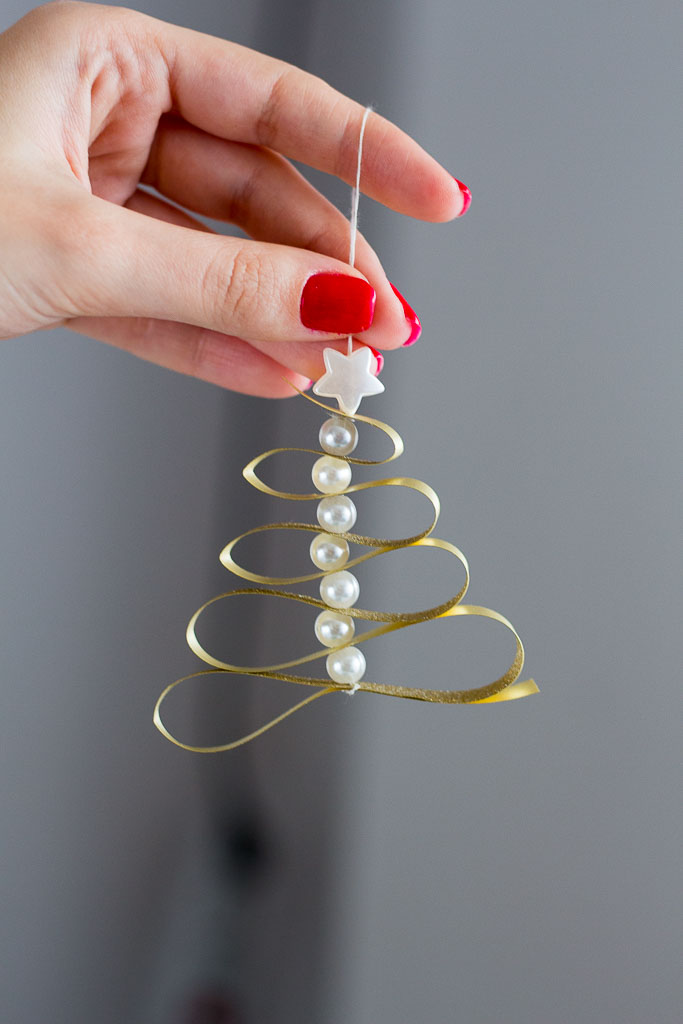
I told you they’re Christmas trees!

They are so cute, simple and yet elegant. I would make a ton of them and fill the Christmas tree with them only!
Here’s what you will need:
- sparkly ribbon – the one I used is not made out of fabric, it’s something like a soft plastic – I guess. Mine was sparkly only on one side and matte on the other, but if you can find one sparkly on both sides, it’s better! The one I used is one centimetre wide (giving all the details…). Out of one meter of ribbon, I made two decorations. I used silver and gold ribbon – they both look gorgeous.
- white pearl beads – these can be larger or bigger, depending on how wide the ribbon is. Make sure you pick the size accordingly. I used seven beads for each ornament.
- white star beads – to put on top of each tiny tree. You’ll need one for each ornament.
- thread and needle – I used white, simple thread and a regular sewing needle. If you have a
longer , thin needle I highly, highly recommend using it – you’ll see why in a second. - a pair of scissors.
Do It Yourself
As I already said, it proved to be more difficult than I expected to create these cuties. They look so simple and you expect it to be easy to craft. The ribbon was quite soft and it kept unfolding, the beads will tangle in the thread and so on.
– Shape the tree and pierce the holes –
The solution to not lose my mind and give up on this crafting project was to shape the tree and pierce the holes before adding the beads.
With a needle (no thread needed at this point) carefully fold the ribbon in a zigzag motion (similar when folding paper to create a fan) to create a triangle.
Using the needle, pierce a hole in the middle of each “level”. Continue folding the ribbon, making sure it gets narrower – to get the triangle shape, which in the end it will be the tree.
Keep the ribbon stacked on the needle to see how the tree takes shape and to make it even on both sides.

This was the easiest method for me to shape it, ending up with symmetric loops and a beautiful-looking tree.
I created about eight loops in total. But if you have wider ribbon and bigger beads, you can make it taller/larger. Just make sure you make the base wide enough.
– Bring the beads in! –
Now the Christmas tree will start taking shape!
Double knot about 15 cm of double thread.

Take the ribbon out of the “naked” needle, but make sure you pinch the base of the tree (that should be the first loop). If you simply pull the needle out, the ribbon will unfold and you can easily lose the logic of the holes you just pierced.
Now for each loop or level of pierced ribbon, add a bead. The trick that helped me a lot was to keep the tree on the needle, don’t let it go on the thread – it will unfold and it will be a nightmare keeping it together. Here’s why a longer needle comes in hand: a regular needle is too short to keep the entire tree and eventually you’ll have to let it go on the thread.


When you reach the top level, add the star bead on top. Now it looks like a real Christmas tree!
– Secure it –
At this point, the tree will unfold if you don’t secure the thread to keep it all together.

To secure it all together, you’ll have to go back through the beads and holes you initially pierced – this will keep everything nice and neat. Tie a double knot at the bottom of the tree to secure it. Make sure there’s no loop threads along the way and that everything is nice and secured.
– Add the loop –
Now it’s pretty much done, but you still need a loop to hang it in the Christmas tree, right?


For this, I used another piece of double thread (about 10 centimetres), went through the last hole on the top level, went through the star bead, left about a 4-5 cm loop and went back through the star bead and tied a double knot on top of the last bead.
Really hope it makes sense.
Enjoy them!
Just look at them! So delicate and elegant – would make a gorgeous addition to anyone’s Christmas tree!
You can make them for yourself or gift them to someone – they’ll surely be impressed.
Once you get the hang of it, you won’t need more than 10 minutes to create one of these beauties.
Related: DIY Christmas Gift Bows
I hope you enjoyed this tutorial and that it brought some inspiration and boost to start crafting something this Christmas!


14 comments
These are absolutely gorgeous! So easy to make as well. Thanks for the idea. I’m changing my color scheme next year so this is bound to save me on decorations cost.
These are absolutly adorable and so easy to make. I already have my tree up and decorated, but this would be a great addition to the decoration.
OMG, you already have the tree up?! That’s sooo nice! I’ll only get mine in mid-December.
I love these decorations. They are so fabulous and look easy to make! Thanks for sharing this DIY idea.
Omg! How simple but absolutely fab! I’ll have to try this out this year.
xx Tatyanna
http://www.apopoflife.com>http://www.apopoflife.com
These are adorable and I love how easy it is! Love the little pearls that add such a festive touch.
These are so pretty! I think they would make perfect gifts and could also be used as gift tags. I love them.
I haven’t thought of using them as gift tags – such a creative idea!
Oh my, these are adorable! I’ve seen so many DIY ornaments this year, but none like these! Super unique ☺️
These are so pretty! My daughters would love making these!
Those are darling! Love DIY Christmas crafts.
These are so pretty! My daughters would love to make these!
Just make sure they’re careful with the needles! Or take care of that part for them.
These look fab and so easy to make!